任何人都已经成功地使用64位的Eclipse为Android 2.3开发的64位Windows 7?Eclipse、Android、Windows
有没有人成功地使用64位的Eclipse为Android 2.3开发的64位Windows 7?
请回答肯定的仅在,当你通过Eclipse的运行(按Ctrl + F11),您的应用程序,待调试的APK调用仿真器安装的自动到Android模拟器的的和的您运行此完全相同的配置:
在Windows 7旗舰版64位。 在JDK的64位(JDK-6u23-窗口-x64.exe程序安装。) 在JDK 32位(JDK-6u23-窗口-i586.exe安装。) 在Eclipse的经典3.6 64位(eclipse-SDK-3.6.1-win32-x86_64.zip) 安卓 2.3 SDK入门包如果你能够的完全的使用64位的Eclipse为Android 2.3开发的64位Windows 7,请描述你的步骤执行,以实现这一目标。
截至目前,下面的步骤做了不会作为我的工作:
在安装64位JDK 在安装32位JDK 解压缩android-sdk_r08-windows.zip到 C:\ Android的SDK-窗口 追加C:\ Android的SDK-WINDOWS \工具 在系统ENV%PATH%瓦尔。 运行C:\ Android的SDK-WINDOWS \工具> android.bat 通过Eclipse安装ADT插件 创建 - 通过Eclipse的Android 2.3的API等级9虚拟设备 窗口> preferences> Java的>安装的JRE:[搜索...] 解决方案我在这里获得3伟大的答案虽然没有描述的那些配置的原始配置的问题描述确实相符,但是...
最后2答案(尤其是来自@Nicholi一个)提示花时间尚未另一轮的拉我的头发,试图找到一个解决方案,以一种不可名状的问题。
和我找到了!我自己的配置现在可以在64位Windows 7等简单的答案是:是
下面是详细的步骤,顺序,为我工作(剪切和放大器;不断):
步骤0
  ************** *********
******卸载COMODO防火墙! ******
***********************************************
Comodo防火墙,AKA 独联体,竟然是唯一的问题,导致2010年12月间所浪费的时间(当我张贴了这个请求帮助)和2011年2月(当我终于钉这个问题下)。注:禁用防火墙也无济于事,只有完全卸载真正起作用
第1步(JDK 6 64位):
 创建%JAVA_HOME%:C:\ Program Files文件\的Java \ jdk1.6.0_23
追加到%PATH%:C:\ Program Files文件\的Java \ jdk1.6.0_23 \ BIN
兼营:JDK-6u23-windows的-x64.exe程序
请注意:这是的没有的需要安装JDK到C:\ Java语言。与Windows文件夹约定坚持为preferred,因为它可以帮助你记住这包是64位的,哪些是(仍然)32位。
第2步(Eclipse的经典64位):
解压eclipse-SDK-3.6.1-win32-x86_64.zip到C:\日食
注:有eclipse目录直接在C是至关重要的:\和不可以C:\ Program Files文件下。(否则,ADT插件安装会产生丢失包的问题)
第3步(SDK入门包又名Android SDK中):
 创建%ANDROID_HOME%:C:\ Android的SDK-窗口
追加到%PATH%:C:\ Android的SDK-WINDOWS \平台工具
运行installer_r09-windows.exe后安装到C:\ Android的SDK-窗口
 >选中启动SDK管理器
   >所有被选中。接受。安装。是的,重新启动ADB。
第四步(ADT Eclipse插件):
帮助>安装新软件和GT;加...
名称:ADT插件
地点:https://dl-ssl.google.com/android/eclipse/
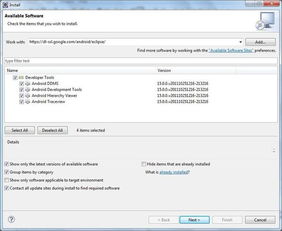
检查联系所有更新站点安装过程中找到所需的软件!
一起工作:所有可用的网站
+开发工具
+ Android的DDMS 9.0.1.v201101191456-93220
+ Android开发工具9.0.1.v201101191456-93220
+ Android的层次浏览器9.0.1.v201101191456-93220
>下一个
>下一个
>完
>重启Eclipse
第5步(Android虚拟设备):
 打开Eclipse。然后:
  窗口> Android SDK和AVD管理
   >虚拟设备[新...]
     名称:AVD23
     目标:安卓2.3.1  -  API级别9
     SD卡:1024 MIB
     [创建AVD]
Has anyone been successful in using 64-bit Eclipse for Android 2.3 dev on 64-bit Windows 7?
Please answer positively only if, when you invoke the emulator via Eclipse's Run (Ctrl+F11), your app-to-be-debugged's APK is installed automatically onto the Android emulator and you are running this same exact configuration:
Windows 7 Ultimate 64-bit. JDK 64-bit (jdk-6u23-windows-x64.exe installed.) JDK 32-bit (jdk-6u23-windows-i586.exe installed.) Eclipse Classic 3.6 64-bit (eclipse-SDK-3.6.1-win32-x86_64.zip) Android 2.3 SDK Starter PackageIf you are able to fully use 64-bit Eclipse for Android 2.3 dev on 64-bit Windows 7, please describe the steps you performed to make this happen.
As of now, the following steps did NOT work for me:
install the 64-bit JDK install the 32-bit JDK unzip android-sdk_r08-windows.zip to C:\android-sdk-windows append C:\android-sdk-windows\tools to %PATH% in System env vars. Run C:\android-sdk-windows\tools>android.bat Install ADT Plugin via Eclipse Create "Android 2.3 - API Level 9" virtual device via Eclipse Window > Preferences > Java > Installed JREs: [Search...]解决方案
I received 3 great answers here although none of those described configurations really match the original configuration described in the question, but...
The last 2 answers (especially the one from @Nicholi) prompted to spend the time on yet-another-round of pulling my hair in an attempt to find a solution to an unexplainable problem.
And I found it! My own configuration now works on 64-bit Windows 7 and so the short answer is: Yes.
Here are the detailed steps, in order, that worked for me (cut & keep):
Step 0:
***********************************************
****** UNINSTALL THE COMODO FIREWALL !!! ******
***********************************************
Comodo Firewall, AKA CIS, turned out to be the sole problem leading to the time wasted between December 2010 (when I posted this request for help) and February 2011 (When I finally nailed the problem down). Note: Disabling the firewall doesn't help, only complete uninstall really works.
Step 1 (JDK 6 64-bit):
Create %JAVA_HOME%: C:\Program Files\Java\jdk1.6.0_23
Append to %PATH%:   C:\Program Files\Java\jdk1.6.0_23\bin
Run:                jdk-6u23-windows-x64.exe
Note: It is not necessary to install the JDK into C:\Java. Sticking with the Windows Folders conventions is preferred because it helps you remember which package is 64-bit and which is (still) 32-bit.
Step 2 (Eclipse Classic 64-bit):
Unzip eclipse-SDK-3.6.1-win32-x86_64.zip into C:\eclipse
Note: It is critical to have the eclipse directory directly under C:\ and not under "C:\Program Files" (otherwise, ADT Plugin install will incur missing packages problems).
Step 3 (SDK Starter Package AKA "Android SDK"):
Create %ANDROID_HOME%: C:\android-sdk-windows
Append to %PATH%:      C:\android-sdk-windows\platform-tools
Run installer_r09-windows.exe and install to C:\android-sdk-windows
 > Check 'Start SDK Manager'
   > All are selected. Accept. Install. Yes, restart ADB.
Step 4 (ADT Plugin for Eclipse):
Help > Install New Software > Add...
  Name:     ADT Plugin
  Location: https://dl-ssl.google.com/android/eclipse/

  Check "Contact all update sites during install to find required software'!!!

Work with: All available sites
  + Developer Tools
    + Android DDMS              9.0.1.v201101191456-93220
    + Android Development Tools 9.0.1.v201101191456-93220
    + Android Hierarchy Viewer  9.0.1.v201101191456-93220
  > Next
  > Next
  > Finish
  > Restart Eclipse
Step 5 (Android Virtual Device):
Open Eclipse. Then:
  Window > Android SDK and AVD Manager
   > Virtual Devices [New...]
     Name: AVD23
     Target: Android 2.3.1 - API Level 9
     SD Card: 1024 MiB
     [Create AVD]
上一篇:如何找出屏幕状态在Android设备上?屏幕、状态、设备、Android
下一篇:有没有办法从 JavaScript 检测到我在 Selenium Webdriver 页面中我在、没有办法、检测到、页面