RelativeLayout的/ customview不补片的宽度宽度、RelativeLayout、customview、不补片
我想,以填补一个视图选项卡。有关确切的事情的详细信息,我尽量做到这样的观点,请阅读我的previous问题:How自定义各个选项卡? (改变背景颜色,指示灯的颜色,文本颜色)
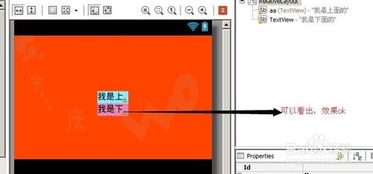
我现在得到的结果是这样的:
正如你所看到的标签是不完全充满在其宽度的观点。
我的布局XML:
< XML版本=1.0编码=UTF-8&GT?;
< RelativeLayout的的xmlns:机器人=http://schemas.android.com/apk/res/android
机器人:layout_width =match_parent
机器人:layout_height =match_parent
机器人:方向=垂直
机器人:背景=@彩色/黑白
>
<的TextView
机器人:ID =@ + ID / nieuws_tab_layout
机器人:layout_width =match_parent
机器人:layout_height =match_parent
机器人:重力=中心
机器人:文本=@字符串/呼号
机器人:文字颜色=@机器人:彩色/白
机器人:TEXTSTYLE =黑体/>
< / RelativeLayout的>
我的MainActivity:
 包com.example.android.effectivenavigation;

进口android.app.ActionBar;
进口android.app.ActionBar.Tab;
进口android.app.FragmentTransaction;
进口android.content.Context;
进口android.content.Intent;
进口android.os.Bundle;
进口android.support.v4.app.Fragment;
进口android.support.v4.app.FragmentActivity;
进口android.support.v4.app.FragmentManager;
进口android.support.v4.app.FragmentPagerAdapter;
进口android.support.v4.view.ViewPager;
进口android.view.LayoutInflater;
进口android.view.View;
进口android.view.ViewGroup;
进口android.widget.TextView;

公共类MainActivity扩展FragmentActivity实现ActionBar.TabListener
{
    AppSectionsPagerAdapter mAppSectionsPagerAdapter;
    //在时间段的viewpager显示器
    ViewPager mViewPager;

    公共无效的onCreate(包savedInstanceState)
    {
        super.onCreate(savedInstanceState);
        的setContentView(R.layout.activity_main);

        //创建将返回一个片段为三个主要部分的适配器
        //应用程序的。
        mAppSectionsPagerAdapter =新AppSectionsPagerAdapter(getSupportFragmentManager());

        //设置操作栏。
        最后的动作条动作条= getActionBar();
        //设置自定义动作条
        actionBar.setCustomView(R.layout.titlebar);
        //显示定制设计的动作条
        actionBar.setDisplayShowCustomEnabled(真正的);
        //打开homeIcon视图
        查看homeIcon = findViewById(android.R.id.home);
        //隐藏视图(等图标)
        ((查看)homeIcon.getParent())setVisibility(View.GONE)。

        //指定,我们将在操作栏中显示的标签。
        actionBar.setNavigationMode(ActionBar.NAVIGATION_MODE_TABS);

        //设置的ViewPager,将适配器,并设立一个监听器,当
        //部分之间的用户刷卡。
        mViewPager =(ViewPager)findViewById(R.id.pager);
        mViewPager.setAdapter(mAppSectionsPagerAdapter);

        mViewPager.setOnPageChangeListener(新ViewPager.SimpleOnPageChangeListener()
        {
            @覆盖
            公共无效onPageSelected(INT位置)
            {
                    //当不同的应用程序部分之间刷卡,选择相应的选项卡。
                    //我们也可以使用ActionBar.Tab#选择()要做到这一点,如果我们有一个参考的选项卡。
                    actionBar.setSelectedNavigationItem(位置);
            }
        });


        //对于每个应用程序的章节中,添加一个标签,操作栏。
        的for(int i = 0; I< mAppSectionsPagerAdapter.getCount();我++)
        {
            如果(我== 0)
            {
                //最后查看firstCustomView =新CustomView(本);
                //firstCustomView.setBackgroundColor(Color.BLUE);
                。TAB键= actionBar.newTab()setTabListener(本).setCustomView(R.layout.nieuws_tab_layout);

                actionBar.addTab(标签);
            }
            其他
            {
            //创建与对应于由适配器中定义的页面标题文本标签。
            //还可以指定这个活动对象,它实现了TabListener接口,作为
            //监听器当选择该选项卡。
            TAB键= actionBar.newTab()的setText(mAppSectionsPagerAdapter.getPageTitle(I))setTabListener(本)。;
            actionBar.addTab(标签);
            }
        }
    }

    @覆盖
    公共无效onTabUnselected(ActionBar.Tab选项卡,FragmentTransaction fragmentTransaction)
    {
    }

    @覆盖
    公共无效onTabSelected(ActionBar.Tab选项卡,FragmentTransaction fragmentTransaction)
    {
        // CustomView CTV;
        // CTV =新CustomView(背景下,R.attr.tabStyleAttr);
        //当选择给定的标签,切换到在ViewPager相应页面。
        // LayoutInflater充气=(LayoutInflater)getSystemService(LAYOUT_INFLATER_SERVICE);
        //查看TabView的= inflater.inflate(R.layout.nieuws_tab_layout,NULL);
        //tabView.setBackgroundColor(0xFF00FF00);
        //tab.setCustomView(tabView);
        mViewPager.setCurrentItem(tab.getPosition());
    }

    @覆盖
    公共无效onTabReselected(ActionBar.Tab选项卡,FragmentTransaction fragmentTransaction)
    {
    }

    公共静态类AppSectionsPagerAdapter扩展FragmentPagerAdapter
    {
        公共AppSectionsPagerAdapter(FragmentManager FM)
        {
            超(FM);
        }

        @覆盖
        公共片段的getItem(int i)以
        {
            开关(ⅰ)
            {
                情况下0:
                    //应用程序的第一部分是最有趣的 - 它提供
                    //一个启动板成这个示例应用程序的其他示威。
                    返回新LaunchpadSectionFragment();

                默认:
                    //应用程序的其他部分都是假的占位符。
                    片段片段=新DummySectionFragment();
                    捆绑的args =新包();
                    args.putInt(DummySectionFragment.ARG_SECTION_NUMBER,I + 1);
                    fragment.setArguments(参数);
                    返回片段;
            }
        }

        @覆盖
        公众诠释getCount将()
        {
            返回3;
        }

        @覆盖
        公共CharSequence的getPageTitle(INT位置)
        {
            开关(位置)
            {
                情况下0:
                {
                    返回TAB1;
                }
                情况1:
                {
                    返回TAB2;
                }
                案例2:
                {
                    返回TAB3;
                }
                默认:
                {
                    回归第+(位置+ 1);
                }
            }
        }
    }
    公共静态类LaunchpadSectionFragment扩展片段
    {
        @覆盖
        公共查看onCreateView(LayoutInflater充气,容器的ViewGroup,捆绑savedInstanceState)
        {
            查看rootView = inflater.inflate(R.layout.fragment_section_launchpad,集装箱,假);

            //集合浏览活动的示范。
            rootView.findViewById(R.id.demo_collection_button).setOnClickListener(新View.OnClickListener()
            {
                @覆盖
                公共无效的onClick(视图查看)
                {
                    意向意图=新的意图(getActivity(),CollectionDemoActivity.class);
                    startActivity(意向);
                }
            });

            //导航到外部活动的示范。
            rootView.findViewById(R.id.demo_external_activity).setOnClickListener(新View.OnClickListener()
            {
                @覆盖
                公共无效的onClick(视图查看)
                {
                    //创建一个让用户选择一个照片的意图,但使用
                    // FLAG_ACTIVITY_CLEAR_WHEN_TASK_RESET,确保,重振
                    //从设备主屏幕上的应用程序不会返回
                    //到外部的活性。
                    意图externalActivityIntent =新的意图(Intent.ACTION_PICK);
                    externalActivityIntent.setType(图像/ *);
                    externalActivityIntent.addFlags(
                    Intent.FLAG_ACTIVITY_CLEAR_WHEN_TASK_RESET);
                    startActivity(externalActivityIntent);
                }
            });
            返回rootView;
        }
    }

    / **
     *一个虚拟片段重新presenting应用程序的一部分,但只是显示虚拟文本。
     * /
    公共静态类DummySectionFragment扩展片段
    {
        公共静态最后弦乐ARG_SECTION_NUMBER =section_number标;

        @覆盖
        公共查看onCreateView(LayoutInflater充气,容器的ViewGroup,捆绑savedInstanceState)
        {
            查看rootView = inflater.inflate(R.layout.fragment_section_dummy,集装箱,假);
            捆绑的args = getArguments();
            ((TextView的)rootView.findViewById(android.R.id.text1))的setText(的getString(R.string.dummy_section_text,args.getInt(ARG_SECTION_NUMBER)));
            返回rootView;
        }
    }
    公共类CustomView扩展视图
    {
        公共CustomView(上下文的背景下)
        {
            超(背景下,NULL);
        }
    }
}
解决方案
这些都是垫。使用样式下面与您 TabHost 来摆脱他们,或者设置安卓paddingStart 和 Android的:paddingEnd 到 0dp 直接布局
的Android 4.0及更高版本
 <样式名称=TabStyle父=@安卓风格/ Widget.Holo.Light.ActionBar.TabView>
    <项目名称=机器人:paddingStart> 0dip< /项目>
    <项目名称=机器人:paddingEnd> 0dip< /项目>
< /风格>
较早的Android
 <样式名称=TabStyle父=@安卓风格/ Widget.ActionBar.TabView>
    <项目名称=机器人:paddingStart> 0dip< /项目>
    <项目名称=机器人:paddingEnd> 0dip< /项目>
< /风格>
I'm trying to fill a tab with a view. For more information about the exact thing I try to achieve with the view please read my previous question : How to customize individual tabs? (changing background color, indicator color and text color)
The result I got now is this :
As you can see the tab is not completely filled with the view in its width.
my layout xml :
<?xml version="1.0" encoding="utf-8"?>
<RelativeLayout xmlns:android="http://schemas.android.com/apk/res/android"

    android:layout_width="match_parent"
    android:layout_height="match_parent"
    android:orientation="vertical"
    android:background ="@color/black"
    >

  <TextView
      android:id="@+id/nieuws_tab_layout"
      android:layout_width="match_parent"
      android:layout_height="match_parent"
      android:gravity="center"
      android:text="@string/nieuws"
      android:textColor="@android:color/white"
      android:textStyle="bold"/>
</RelativeLayout>
My MainActivity :
package com.example.android.effectivenavigation;

import android.app.ActionBar;
import android.app.ActionBar.Tab;
import android.app.FragmentTransaction;
import android.content.Context;
import android.content.Intent;
import android.os.Bundle;
import android.support.v4.app.Fragment;
import android.support.v4.app.FragmentActivity;
import android.support.v4.app.FragmentManager;
import android.support.v4.app.FragmentPagerAdapter;
import android.support.v4.view.ViewPager;
import android.view.LayoutInflater;
import android.view.View;
import android.view.ViewGroup;
import android.widget.TextView;

public class MainActivity extends FragmentActivity implements ActionBar.TabListener
{
    AppSectionsPagerAdapter mAppSectionsPagerAdapter;
    //The viewpager displays on of the section at a time
    ViewPager mViewPager;

    public void onCreate(Bundle savedInstanceState)
    {
        super.onCreate(savedInstanceState);
        setContentView(R.layout.activity_main);

        // Create the adapter that will return a fragment for each of the three primary sections
        // of the app.
        mAppSectionsPagerAdapter = new AppSectionsPagerAdapter(getSupportFragmentManager());

        // Set up the action bar.
        final ActionBar actionBar = getActionBar();
        //set custom actionbar
        actionBar.setCustomView(R.layout.titlebar);
        //Displays the custom design in the actionbar
        actionBar.setDisplayShowCustomEnabled(true);
        //Turns the homeIcon a View
        View homeIcon = findViewById(android.R.id.home);
        //Hides the View (and so the icon)
        ((View)homeIcon.getParent()).setVisibility(View.GONE);

        // Specify that we will be displaying tabs in the action bar.
        actionBar.setNavigationMode(ActionBar.NAVIGATION_MODE_TABS);

        // Set up the ViewPager, attaching the adapter and setting up a listener for when the
        // user swipes between sections.
        mViewPager = (ViewPager) findViewById(R.id.pager);
        mViewPager.setAdapter(mAppSectionsPagerAdapter);

        mViewPager.setOnPageChangeListener(new ViewPager.SimpleOnPageChangeListener()
        {
            @Override
            public void onPageSelected(int position)
            {
                    // When swiping between different app sections, select the corresponding tab.
                    // We can also use ActionBar.Tab#select() to do this if we have a reference to the Tab.
                    actionBar.setSelectedNavigationItem(position);
            }
        });


        // For each of the sections in the app, add a tab to the action bar.
        for (int i = 0; i < mAppSectionsPagerAdapter.getCount(); i++)
        {
            if(i == 0)
            {
                //final View firstCustomView = new CustomView(this);
                //firstCustomView.setBackgroundColor(Color.BLUE);
                Tab tab = actionBar.newTab().setTabListener(this).setCustomView(R.layout.nieuws_tab_layout);

                actionBar.addTab(tab);
            }
            else
            {
            // Create a tab with text corresponding to the page title defined by the adapter.
            // Also specify this Activity object, which implements the TabListener interface, as the
            // listener for when this tab is selected.
            Tab tab = actionBar.newTab().setText(mAppSectionsPagerAdapter.getPageTitle(i)).setTabListener(this);
            actionBar.addTab(tab);
            }
        }
    }

    @Override
    public void onTabUnselected(ActionBar.Tab tab, FragmentTransaction fragmentTransaction)
    {
    }

    @Override
    public void onTabSelected(ActionBar.Tab tab, FragmentTransaction fragmentTransaction)
    {
        //CustomView ctv;
        //ctv = new CustomView(context, R.attr.tabStyleAttr);
        // When the given tab is selected, switch to the corresponding page in the ViewPager.
        //LayoutInflater inflater = (LayoutInflater) getSystemService(LAYOUT_INFLATER_SERVICE);
        //View tabView = inflater.inflate(R.layout.nieuws_tab_layout, null);
        //tabView.setBackgroundColor(0xFF00FF00);
        //tab.setCustomView(tabView);
        mViewPager.setCurrentItem(tab.getPosition());
    }

    @Override
    public void onTabReselected(ActionBar.Tab tab, FragmentTransaction fragmentTransaction)
    {
    }

    public static class AppSectionsPagerAdapter extends FragmentPagerAdapter
    {
        public AppSectionsPagerAdapter(FragmentManager fm)
        {
            super(fm);
        }

        @Override
        public Fragment getItem(int i)
        {
            switch (i)
            {
                case 0:
                    // The first section of the app is the most interesting -- it offers
                    // a launchpad into the other demonstrations in this example application.
                    return new LaunchpadSectionFragment();

                default:
                    // The other sections of the app are dummy placeholders.
                    Fragment fragment = new DummySectionFragment();
                    Bundle args = new Bundle();
                    args.putInt(DummySectionFragment.ARG_SECTION_NUMBER, i + 1);
                    fragment.setArguments(args);
                    return fragment;
            }
        }

        @Override
        public int getCount()
        {
            return 3;
        }

        @Override
        public CharSequence getPageTitle(int position)
        {
            switch(position)
            {
                case 0:
                {
                    return "Tab1";
                }
                case 1:
                {
                    return "Tab2";
                }
                case 2:
                {
                    return "Tab3";
                }
                default:
                {
                    return "Section " + (position + 1);
                }
            }
        }
    }
    public static class LaunchpadSectionFragment extends Fragment
    {
        @Override
        public View onCreateView(LayoutInflater inflater, ViewGroup container,Bundle savedInstanceState)
        {
            View rootView = inflater.inflate(R.layout.fragment_section_launchpad, container, false);

            // Demonstration of a collection-browsing activity.
            rootView.findViewById(R.id.demo_collection_button).setOnClickListener(new View.OnClickListener()
            {
                @Override
                public void onClick(View view)
                {
                    Intent intent = new Intent(getActivity(), CollectionDemoActivity.class);
                    startActivity(intent);
                }
            });

            // Demonstration of navigating to external activities.
            rootView.findViewById(R.id.demo_external_activity).setOnClickListener(new View.OnClickListener()
            {
                @Override
                public void onClick(View view)
                {
                    // Create an intent that asks the user to pick a photo, but using
                    // FLAG_ACTIVITY_CLEAR_WHEN_TASK_RESET, ensures that relaunching
                    // the application from the device home screen does not return
                    // to the external activity.
                    Intent externalActivityIntent = new Intent(Intent.ACTION_PICK);
                    externalActivityIntent.setType("image/*");
                    externalActivityIntent.addFlags(
                    Intent.FLAG_ACTIVITY_CLEAR_WHEN_TASK_RESET);
                    startActivity(externalActivityIntent);
                }
            });
            return rootView;
        }
    }

    /**
     * A dummy fragment representing a section of the app, but that simply displays dummy text.
     */
    public static class DummySectionFragment extends Fragment
    {
        public static final String ARG_SECTION_NUMBER = "section_number";

        @Override
        public View onCreateView(LayoutInflater inflater, ViewGroup container, Bundle savedInstanceState)
        {
            View rootView = inflater.inflate(R.layout.fragment_section_dummy, container, false);
            Bundle args = getArguments();
            ((TextView) rootView.findViewById(android.R.id.text1)).setText(getString(R.string.dummy_section_text, args.getInt(ARG_SECTION_NUMBER)));
            return rootView;
        }
    }
    public class CustomView extends View
    {
        public CustomView(Context context)
        {
            super(context, null);
        }
    }
}
解决方案
Those are paddings. Use the style below with your TabHost to get rid of them, or set android:paddingStart and android:paddingEnd to 0dp in your layout directly.
Android 4.0 and higher
<style name="TabStyle" parent="@android:style/Widget.Holo.Light.ActionBar.TabView">
    <item name="android:paddingStart">0dip</item>
    <item name="android:paddingEnd">0dip</item>
</style>
Older Android
<style name="TabStyle" parent="@android:style/Widget.ActionBar.TabView">
    <item name="android:paddingStart">0dip</item>
    <item name="android:paddingEnd">0dip</item>
</style>